Fall is the perfect time to hit the refresh button on your entire bedroom set. With the cooler months rolling in, you’ll want to spend those cozy fall nights snuggled up in bed with a glass of wine or a hot chocolate, watching an old movie or reading your favorite book. So make sure your bedroom set is as comfy as possible to prepare for hibernation season.
Our Lexington bed set has everything you need, including a bed, an armoire, two dressers to choose from and a couple of nightstand options. This classic set is sturdy and handmade, so the quality is incomparable to what you’ll find in regular furniture stores. Depending on your style preferences, the set is available in a number of different finish options from very light brown maple for a more rustic look to a dark cherry that provides a more modern look. Depending on your tastes and preferences, we’ll work with you to find the perfect finish for your set.
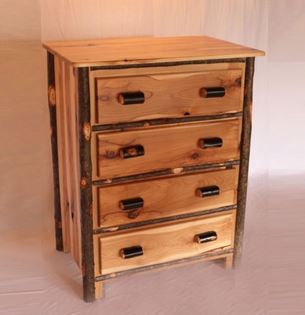
 If you want to update your bedframe and are looking for a funkier option, check out our hickory bed. This bed is built to last and is tougher than nails. Hickory is a great wood for furniture making because it’s particularly sturdy, so when you buy a sturdy hickory wood bed frame, it can easily be the last one you ever buy. We offer this bed in all common mattress sizes and each one is built to order, sure to pair nicely with any of our other bedroom pieces.
Carriage House Furnishings has tons of options to choose from for anyone looking for the perfect rustic-chic-inspired bedroom set to complement your style and upgrade your cozy bedroom. The best part is, we’re a one-stop shop for all the furniture you need, and all of our pieces are handmade by extremely attentive and talented Amish craftsmen.
The cooler months are nearly upon us, so don’t wait – update your bedroom furniture this fall so that you can spend the cozy fall months snuggled up in your newly refreshed bedroom, courtesy of Carriage House Furnishings. Stop in and see our inventory in person at the former Lapps Coach Shop in Intercourse or call us today at 717-768-8712 to learn more.

 Amish furniture first rose to popularity in the 1920s as people of the time looked for furniture made a simpler way of life from a simpler time, without all of the technology used at the time.

 Are you looking for that one piece of quality furniture that will transform your kitchen or foyer into a beautiful picture of the past? Then you should look into a gorgeous and beautifully crafted pie safe. But what is a pie safe, and where did they originate? Read on for a history lesson about these impressive pieces of furniture.


 Calling all lovers of reading! March is National Reading Month, which means it’s time to dive back into stories you’ve loved and try a few new tales out, too.
Recent Comments